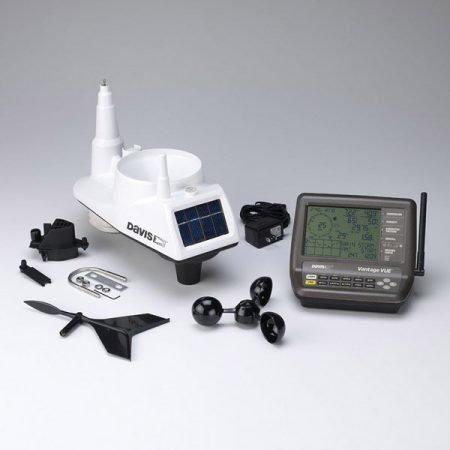
The existing featured photograph remains: legacy Davis Vantage Vue equipment with the original LCD console. That console does not provide an internet connection by itself.
You do not necessarily need a WeatherBridge to connect a home weather station to Weather Underground. Many compatible consoles and gateways already have an upload function; other systems share through their manufacturer’s online service. Older equipment may need a data logger, a continuously running computer or a compatible bridge.
Weather Underground is the receiving weather-data service, not a particular weather station. Start with the exact model of your console or gateway—not simply the brand on the outdoor sensor. “Wireless” can mean a sensor-to-console radio connection, and Wi-Fi alone does not establish Weather Underground compatibility.
Find the connection route for your equipment
The usual chain is outdoor sensors → console, gateway or hub → home network/internet → Weather Underground. A manufacturer’s cloud service or a computer may sit between your equipment and Weather Underground.
| Equipment or method | Upload route | What to check first |
|---|---|---|
| Compatible Ambient Weather WS-2902 console | Direct console upload | Use the instructions for your original/A/B/C/D generation; setup interfaces differ. No separate WeatherBridge is normally needed. |
| AcuRite Iris/Atlas direct-to-Wi-Fi displays covered by the legacy setup guide | Direct display upload | Exact display model, adapter power and 2.4 GHz Wi-Fi. This is different from configuring sharing through NOW+. |
| Supported AcuRite NOW equipment or legacy Access using NOW+ sharing | Manufacturer-service route; subscription-dependent | AcuRite’s current procedure requires a NOW+ PassKey as well as the separate Weather Underground credentials. |
| Davis WeatherLink Console or WeatherLink Live | Davis-supported WeatherLink sharing | Configure Weather Underground under the device’s WeatherLink upload settings; do not follow original LCD-console instructions. |
| Compatible Ecowitt console/gateway, such as GW2000 | Console/gateway upload | Configure the Weather Underground service in the supported local interface. Sensors and regional radio versions must match the gateway. |
| Tempest | Hub plus Tempest online integration | Link Weather Underground from the Tempest website’s Public Data settings, not the mobile app. |
| Legacy console with supported logger/software or WeatherBridge | Computer- or bridge-mediated upload | Verify the exact console, interface and required accessories before buying anything. |
These are documented routes, not a promise that every product carrying one of these brands works. If your exact receiver has no documented upload route, treat compatibility as unverified.
Register the station and enter its upload credentials
- Check local readings first. Confirm that the console or gateway is receiving current outdoor observations. An internet connection cannot repair a missing sensor signal.
- Sign in to Weather Underground and register your PWS. Start at My Devices, add a personal weather station and supply the requested equipment and location information. Review what information will be public.
- Find the assigned Station ID and Station Key. These belong to the registered station. A device field labelled “password” may mean the Station Key, not your Weather Underground account-login password. Keep the key private.
- Enter the credentials in the correct uploader. That might be your console’s setup page, a gateway interface, the manufacturer’s account or your upload software. Network SSID/password fields are separate from Weather Underground fields.
- Save and verify the station’s latest observation time on Weather Underground. Follow the device’s documented reporting interval and allow for registration/processing delays. There is no single upload interval that applies to every station.
The registration entry point is Weather Underground’s PWS service. Manufacturer instructions explain where the resulting credentials belong; for example, AcuRite’s direct-to-Wi-Fi guide and WeeWX’s uploader documentation distinguish upload credentials from ordinary account access.
Brand-specific setup notes
Ambient Weather: use your console generation
A compatible WS-2902 console provides the upload route, so buying WeatherBridge just to reach Weather Underground would normally add unnecessary hardware. However, the original console and later revisions do not all use the same setup method. Identify your generation using our WS-2902 and WS-2902D guide, then follow the appropriate Ambient Weather support instructions.
AcuRite: distinguish direct Wi-Fi from NOW+ sharing
For the legacy Iris/Atlas direct-to-Wi-Fi displays covered by AcuRite’s guide, the display connects to 2.4 GHz Wi-Fi and accepts the WU Station ID/key. Adapter power matters: that guide says Wi-Fi transmission is unavailable on backup batteries alone.
The newer AcuRite NOW+ sharing procedure is a separate path, including supported legacy Access equipment. It requires activating NOW+ with a PassKey before entering the WU Station ID and key and starting streaming. The NOW+ PassKey and WU Station Key are different credentials. Do not assume an old My AcuRite or PC Connect tutorial describes today’s account/service requirements. Our AcuRite Wi-Fi setup guide separates current and legacy equipment.
Davis: the receiver matters as much as the sensor
The original Davis 6250 Vantage Vue kit pictured on this page includes the older LCD console. It is not a complete internet-upload system by itself. Preserve the distinction between that legacy Vantage Vue equipment and a WeatherLink Console or WeatherLink Live installation.
Davis documents WU sharing through WeatherLink’s device upload settings. Its WeatherLink FAQ also explains that USB/serial logger installations using a computer need that computer running for uploads. WeatherLink’s paid history/export features are separate considerations; do not assume every advertised feature is included with basic account access.
Ecowitt: configure the gateway’s weather service
Supported Ecowitt receivers can upload to WU through their weather-service settings. The WS View Plus and Web UI manual distinguishes older interfaces from newer gateways and explains local configuration. A compatible sensor still needs its receiving console/gateway; the sensor’s radio connection is not an internet connection. Do not assume every extra sensor measurement shown locally will appear on WU.
Tempest: link accounts on the website
With the Tempest system online, use the Tempest website: Settings → Stations → your station → Public Data → Link to Weather Underground. Enter the WU Station ID and key. Public sharing must be enabled. Tempest’s integration instructions say a new station may need at least an hour before linking becomes available, and WU display can take another 30 minutes to an hour or longer. This is the supported online integration; no additional WeatherBridge is required.
When WeatherBridge still makes sense
WeatherBridge can give compatible older equipment a network uploader without leaving a PC running. Ambient Weather still lists the standard WeatherBridge, and its Meteobridge software platform remains maintained. It is not a universal radio receiver for arbitrary weather sensors.
For a legacy Davis console, the standard bridge requires the supported logger/interface arrangement. Check Ambient’s current compatibility and accessory requirements against what you already own. Do not assume the bridge purchase includes a Davis data logger.
The WeatherBridge PRO2 is a different device with direct reception of specified compatible sensor systems. It is not interchangeable with the standard console-connected bridge; receiver compatibility and radio region matter.
Computer software is another option where the hardware has a supported interface. WeeWX documents WU uploading, but it is a separate software project requiring compatible hardware and an operating computer—not a universal manufacturer-supported workaround. Standard Meteobridge licensing also distinguishes continued use from the time-limited entitlement to new updates; check current licence terms before comparing ownership costs.
If Weather Underground is not updating
Work along the connection chain before resetting equipment or buying a replacement:
- No current readings locally: investigate sensor power, pairing and reception using the exact model’s instructions.
- Local readings work, but the uploader is offline: check console/gateway power and its network connection. A solar-powered outdoor sensor does not keep your router or indoor console powered.
- The manufacturer’s dashboard works, but WU does not: check the selected upload service, Station ID/key and any required sharing or subscription setting. A working cloud dashboard does not prove the separate WU connection is configured.
- The station appears, but its timestamp is stale: compare the last observation time with your uploader’s interval and status. Allow the documented initial delay; avoid repeated registration or factory resets as a first step.
- Values arrive but look wrong: check siting, units and model-specific calibration guidance. Use our sensor siting checklist and maintenance guidance. Do not recalibrate solely to match a neighbour’s station.
If these checks do not locate the fault, contact the uploader’s manufacturer with the model and error message. Redact passwords and station keys from screenshots. Internet or service interruptions can stop sharing even while a local display continues working.
What sharing does—and does not—provide
Joining a personal weather station network makes local observations available beyond your display. It does not guarantee an exact forecast for your property or turn a personal station into an official warning system.
If your goal is irrigation, see our Rachio compatibility and setup guide: sending data to WU and having another service use it are separate steps. If you genuinely need new hardware, compare the complete upload path alongside the sensors in our weather station buying guide. Start with what your existing equipment can already do.