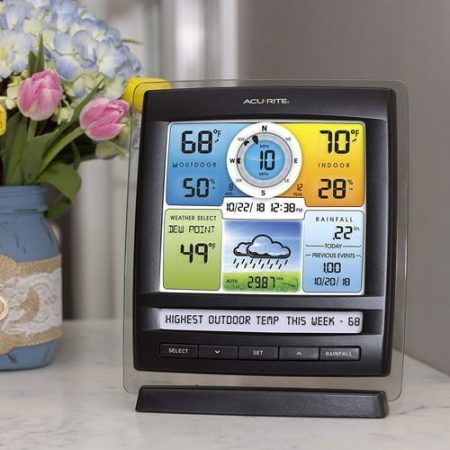
The AcuRite Pro 01512 is a five-in-one weather station with a local color display. This guide focuses on the original 01512/01512MCB configuration: its Weather Ticker display, outdoor sensor and repair options. It is not an Atlas, and its wireless sensor connection is not Wi-Fi.
AcuRite now uses Iris for this five-in-one family. Its current manufacturer package, 01512MCBA1BK, advertises a redesigned 2026 outdoor sensor. Do not assume that an older 01512 or an Amazon listing marked 01512MCB includes that redesign. Check the labels on your own display and sensor before ordering parts. Current manufacturer package.
The existing photograph shows the legacy 01512/06016-style display. The redesigned 2026 outdoor sensor is not pictured.
This guide is based on manufacturer documentation, not personal hands-on testing. As an Amazon Associate I earn from qualifying purchases. Shopping links marked “paid link” may earn us a commission at no additional cost to you.
Identify your hardware and manual
Use AcuRite’s original 01512/01531 manual for the original station. AcuRite identifies the light-theme 06016M display as the display supplied with 01512; its 06016RM display manual provides another reference for those controls.
The original package uses a single-solar-panel five-in-one outdoor array. AcuRite links the 06004 sensor manual from its package page, but individual sensor revisions should be identified from their own labels. A package number does not establish which small internal replacement board your sensor accepts.
The array measures outdoor temperature, humidity, wind speed/direction and rainfall. The display supplies indoor readings and pressure-based forecasting. This display does not provide a native Wi-Fi or PC Connect upload path. If remote access is your objective, first consult our AcuRite connectivity guide rather than trying to pair the display with your router.
Set up power, pairing and placement
- Match the A-B-C switch in the display and outdoor sensor.
- Fit four AA batteries in the outdoor sensor. Its solar panel runs the internal ventilation fan; it does not replace these batteries.
- Power the display with its specified adapter. Six AA batteries provide optional backup. On battery power alone, the backlight is temporary; adapter power enables the normal illuminated-display operation.
- Follow the manual’s time, date and unit settings. Confirm outdoor readings before mounting the sensor.
- Remove the rain collector’s shipping stabilizer, mount the array level and orient its solar panel south as directed for this installation.
The documented sensor-to-display range is up to 330 feet/100 metres, affected by construction and obstructions. That is a radio-communication specification, not internet coverage. Check reception at the intended location before permanent installation.
Allow clear exposure around the rain collector and wind sensor, away from artificial heat sources. Residential sites involve compromises: our sensor siting checklist explains them without requiring a professional observing site.
Troubleshoot the symptom before replacing equipment
Missing outdoor readings: Check battery condition, matching channels and the signal indicator first. Reduce the distance and move the display away from interfering electronics. AcuRite’s Iris troubleshooting guidance is useful, but use your exact display manual for reset controls.
Rain stays at zero: Check the shipping stabilizer and collector for obstructions. A blocked or unlevel tipping mechanism can stop useful rainfall readings; it does not automatically mean the whole array has failed. Follow AcuRite’s rainfall troubleshooting procedure before purchasing parts.
Wind readings seem low: Check exposure and whether the cups turn freely. Nearby roofs, fences and trees affect readings. Comparing a sheltered backyard sensor with an airport anemometer at a different height is not a controlled accuracy test. See AcuRite’s wind checks.
Display appears blank or dim: Check the adapter, outlet and backup batteries before condemning the display. Battery-only backlighting behaves differently from adapter-powered operation.
Reconnect carefully; factory reset comes last
Before removing all power or resetting: Record calibration adjustments and any important rainfall/history values. AcuRite warns that calibration is erased after a display reset or complete loss of display power. A factory reset restores defaults and requires settings such as date/time to be entered again.
For a lost connection, the original manual’s troubleshooting sequence brings the devices indoors, removes power from both, then powers the outdoor sensor first and display second, keeping them a few feet apart while they reconnect.
Only if simpler checks fail, use the factory-reset instructions for your exact display. The 01512 manual describes holding CLEAR ALL/RESET for more than 10 seconds; the 06016 display manual specifies a 10-second hold. This is not a universal AcuRite procedure. Our model-specific reset guide covers other hardware families.
Interpret forecasts, records and alerts realistically
The forecast icons describe expected conditions over roughly the next 12–24 hours. They are separate from measured rainfall and temperature. The display needs an initial pressure-learning period; its weekly/monthly temperature records describe the past, not a prediction of next week’s temperatures.
Weather Ticker messages and local thresholds can supplement awareness. They do not guarantee storm warning or prove conditions are safe. The stated 0–99 mph wind measurement range is not a storm-survival rating. Humidity readings also do not measure overall indoor air quality.
Use official forecasts and warnings for protective decisions. Follow NWS lightning guidance: seek safe shelter when you hear thunder and remain sheltered for at least 30 minutes after the last thunder.
Replacement parts: match the failed component
Outdoor array: AcuRite documents five-in-one/Iris sensor compatibility with the 06016 display. Its current replacement is 06014MA2BK, the redesigned 2026 dual-panel model. An older 06014M PRO+ array is a separate shopping option after troubleshooting establishes an array failure: check the 06014M outdoor array on Amazon (paid link). This is the outdoor sensor only, not a complete station, and is not the redesigned 06014MA2BK.
Display: AcuRite’s 06016M light-theme display matches the original 01512 display. If power checks indicate a failed console, check the 06016 replacement display on Amazon (paid link). The outdoor array is not included.
Adapter or internal repair: AcuRite lists adapter #1, 11202-5V250MA, for 01512/06016M on its adapter compatibility page. Do not choose a generic supply by appearance alone. The 11197-VN1HSPCB temperature/humidity board requires both a matching sensor model and AcuRite’s visual compatibility checks. “01512” alone is insufficient to order it.
For smaller mechanical parts, use the AcuRite parts guide and confirm the sensor revision before buying. We have not verified a separate rain-collector replacement for every historical 01512 array.
Keep a working station—or compare a different use case
Replacing a failed component can preserve a useful local station. Compare the repair cost with a complete system and the features you actually need using our AcuRite family guide.
If your objective is travel rather than maintaining this fixed installation, our handheld weather-meter guide and parked-campsite/RV guide address different needs. Neither turns the 01512 into a handheld or internet-connected station.